Rehabilitation of a patient with a severely resorbed maxilla using zygomatic dental implants and a novel prosthetic design for a full-arch zirconia rehabilitation

Introduction

Historically, reconstruction of the severely atrophic maxilla has required multiple grafting procedures to restore lost soft and hard tissues.1,2 The most common approach involves iliac crest harvesting, but it brings inherent surgical risks and possible complications, as well as unpredictable success and resorption rates.3-6 Treatment of the severely resorbed maxilla has been expanded to include the use of dental implants inserted into the zygomatic process while allowing for immediate function.7-11 Zygomatic dental implants prevent the need for extensive grafting with the insertion of implants into a denser and more stable bone. This clinical report summarizes the management of a patient with severe resorption of the maxilla due to a failed previous dental implant treatment and long-term use of a maxillary complete denture. In this case, a single-surgery graftless approach was used with the placement of four zygomatic dental implants and a monolithic full-arch zirconia prosthesis. The patient was diagnosed and treated at the ClearChoice Dental Implant Center in Phoenix, Arizona.

Chronic edentulism

Edentulism is defined as the loss of natural teeth and is an important global public health issue due to its high prevalence (over 10% in adults aged ≥ 50 years) and associated disability.12-14 Edentulism has a direct effect on facial appearance, nutrition, and the ability to eat, speak, and socialize.15 An individual who has become edentulous has reached this dental endpoint condition usually as a result of either periodontal disease or dental caries. Dental caries is the main cause of edentulism in individuals under 45 years of age,16 while periodontal disease is the primary cause of tooth loss in the older population.17 Edentulism creates a lifelong steady state of disability that can be a burden for the duration of a person’s life.18

Failed dental implant treatment

Implant-supported restorations offer a predictable treatment for tooth replacement. The success rate for dental implants is high. Nevertheless, implant failures that require implant removal occur and have been reported.19 Implant removal can compromise the planned functional and esthetic outcome for a patient and usually involves further cost and additional procedures. Predictors for dental implant success and failure are usually classified into patient-related factors (such as general health status, smoking habits, quantity and quality of bone, oral hygiene, and periodic professional maintenance, among others), dental implant characteristics (diameter and length, connection type, surface finish and/or coating, and loading protocol, among others), implant placement, prosthetic design, and clinician experience.20,21

Restorative options for failed implants in the edentulous maxilla

A patient with maxillae that have been previously treated with dental implants that have failed posttreatment has limited treatment alternatives. Maxillary complete dentures are still commonly used for the restoration of edentulous patients. However, a limited residual alveolar ridge creates significant retention and resistance problems and, as a result, these prostheses have poor patient acceptance, as well as compromised function and esthetics. Zygomatic dental implants have been used for the past two decades to treat patients with severely resorbed maxillae. Professor Brånemark introduced the first zygomatic implants in 1988 in the management of patients with maxillofacial defects, and they became available to the dental profession in the late 1990s.22 The most common protocol involved placing at least two zygomatic implants, one in each posterior sextant, with additional conventional implants in the anterior maxilla. All implants were then splinted together to support a screw-retained hybrid fixed-detachable prosthesis.

Traditional and contemporary restorative options for the edentulous maxilla

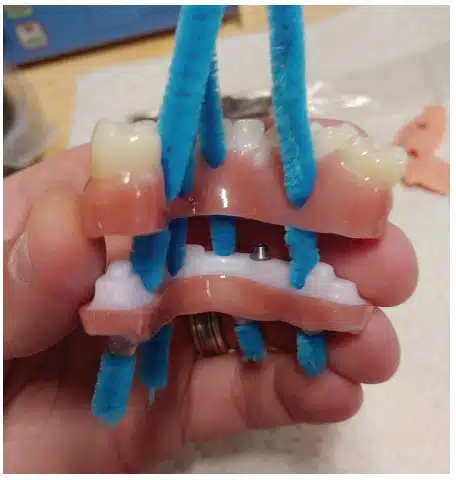
The traditional method for restoring a fully edentulous arch consisted of fabricating the prothesis by securing teeth to a metal framework using acrylic resin.23 Depending on the patient’s form, function, and habits, the denture teeth would wear, chip, or fracture.24,25 The acrylic resin could also deteriorate, while fractures to the titanium framework were also a possibility. Technological advancements led to the development of CAD/CAM-fabricated milled frameworks incorporating different forms of retention to prevent debonding of denture teeth and/or acrylic resin.26 In specific instances of known parafunction or for patients in need of a higher demand of esthetics, individual ceramic crowns were luted to the metal frameworks, and the gingival portion was reconstructed with pink porcelain rather than acrylic resin.27 These reconstruction procedures were rather expensive, time-consuming, and unavailable to the majority of the population due to cost. In general with both types of reconstructions, complications such as fractured or debonded acrylic resin teeth, wear of opposing incisal and occlusal surfaces, ceramic chipping, difficulty in shade matching of acrylic and pink ceramic, lack of passive fit, and extensive repair work after framework fractures led to the search of biomaterial options. Zirconium oxide is a material that has shown increased popularity in contemporary dentistry.28,29 Several studies have demonstrated the physical, mechanical, biological and chemical properties of this material.30,31 Fixed dental prostheses are produced by directly firing veneering porcelain onto a one-piece CAD/CAM-designed and milled zirconia substructure.32,33 However, fracture or chipping of the veneering ceramic34 and of the zirconia substructure have been reported.35 To overcome these problems, CAD/CAM restorations milled from blocks of monolithic zirconia have been introduced as an alternative for implant-supported full-arch reconstructions, reducing the risk of breakage and avoiding chipping. Esthetics can be enhanced with the application of feldspathic pink porcelain or stains to re-create the architecture of the gingival tissues. The design process for the zirconia restoration requires computerized enlargement of the dimensions of the pattern prior to the milling process in order to compensate for linear sintering shrinkage of zirconia by approximately 15%–30%.36 The sintering process comprises three phases: heating, sintering, and cooling, during which the milled structure shrinks to match the size of the original scanned pattern.37 When using zirconia as the prosthetic material to reconstruct atrophic edentulous maxillae, the height of the prosthesis might be greater than the thickness of the sintered zirconia puck, ruling out zirconia as the restorative material.

Clinical report

A 68-year-old male patient visited our office with a chief complaint of embarrassment due to his dental condition and a strong desire to replace his existing maxillary complete denture. The patient had not seen a dentist in more than 10 years and had terminated any dental care due to frustration with his oral condition. His medical history was noncontributory, and his vital signs were within normal limits.

Examination

The patient was not under the care of a physician. He was extremely reserved and skeptical regarding dental implant treatment.

Extraoral examination

Extraoral examination revealed a symmetrical phase with significant reduction on lower-third facial height due to wear of occlusal surfaces of his existing complete denture. His opening and range of motion were within normal limits and presented no symptomatology of his stomathognathic system.

Intraoral examination

The intraoral examination revealed an edentulous maxilla and a partially dentate mandible. The patient presented with a Class III malocclusion resulting from the severe resorption of his maxilla.

Radiographic examination

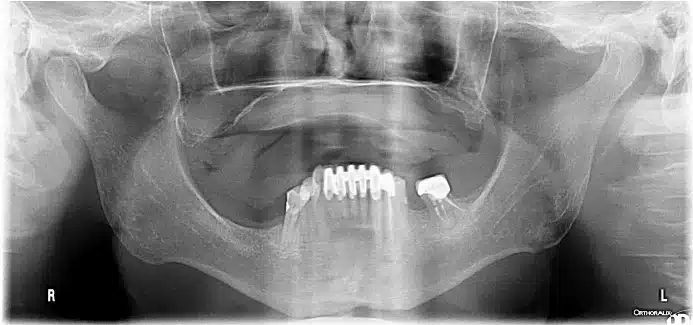
A cone beam computed tomography (CBCT) revealed severe atrophic of his maxillary residual ridge and severely pneumatized maxillary sinuses. Evaluation of his zygomatic processes bilaterally revealed adequate dimensions for use as anchorage for dental implants.

Diagnosis

  1. Edentulous maxillary arch
  2. Partially dentate mandibular arch
  3. Class III malocclusion
  4. Severely atrophied maxilla
  5. Bilateral sinus pneumatization
  6. Poorly fitting maxillary complete denture

Treatment plan

  1. Placement of four dental implants anchored in the zygomatic arches (two per arch) with immediate function procedures through a full-arch fixed acrylic prosthesis.
  2. After healing, fabrication of a full-arch fixed zirconia prosthesis.
  3. Follow-up with the patient every 4 months.
  4. Treatment for replacement of mandibular missing teeth was presented in the form of a removable partial denture, but the patient decided to evaluate the outcome of maxillary arch treatment prior to committing to dental care in the mandible.

Presurgical phase

Following review of the CBCT radiograph, severe maxillary atrophy was noted. The patient rejected the treatment option of bilateral sinus grafting and opted for the use of four zygomatic dental implants to retain a fixed full-arch prosthesis. Impressions were made, a wax rim fabricated, and casts were articulated on a semi-adjustable articulator. Teeth were selected and set on a wax rim and evaluated for esthetics, phonetics, and occlusion. The setup was processed in heat-polymerized acrylic resin to fabricate a maxillary complete denture that would be modified into a fixed provisional prosthesis. The prosthesis was duplicated in clear acrylic resin to fabricate a surgical guide.

Surgical phase

The patient was brought to the suite and placed into a semi-supine position with all the appropriate monitors. Following indicated treatment preparation, incisions were made from the distal tuberosity to the anterior midline and reflections on the anterior lateral parts of the maxilla. Laterally, the refection was taken to the zygomatic process and further to the zygomatic notch. Anteriorly, the inferior orbital nerve and inferior orbital rim were identified and were used as anatomical markers. Slot osteotomies were made in the lateral maxillary walls with a No. 8 round bur under NS irrigation. The sinus membrane was cauterized to minimize bleeding, and through the slot it was reflected from the lateral and superior walls of the sinus. The anterior implant site was now prepared starting in the premaxilla (area of 6/7) using a standard drill sequence under NS irrigation and direct vision. The apical portion of the drill was visualized below the inferior orbital nerve as it exited the superior portion of the zygomatic body. A 50 mm NobelZygoma implant was placed under direct vision to a torque value of 45+ Ncm. The posterior osteotomy was now developed in the second premolar region under direct vision using a sequenced drilling technique to accommodate a 35 mm implant with insertion torque value over 45 Ncm. The left maxilla was addressed with the same technique and same length implants with torque values over 45 Ncm. The right anterior zygomatic implant was covered with a 1 X 2 cm AlloDerm™ graft which was secured to the periosteum with 3.0 chromic gut suture. Closure of the incision site was completed in a watertight interrupted fashion using 3.0 chromic gut suture.

Prosthodontic phase

Primary stability of dental implants placed into zygomatic arches was achieved due to high insertion torque. Impression copings were connected over each abutment, and a vinyl polysiloxane (VPS) rigid impression material was used to make an open tray impression. Accuracy of the impression was confirmed prior to pouring of a master cast. Temporary titanium copings were connected to the abutments, and the denture was relieved accordingly to provide proper fit over primary supporting areas. Self-polymerizing urethanedimethacrylate resin (Quick Up®, VOCO GmbH) was used to connect the copings to the prosthesis. Upon polymerization, the prosthesis was removed and rigidity of the connection confirmed prior to sending the case to the dental laboratory for conversion to a fixed-detachable prosthesis. The interim fixed prosthesis was seated, fit and occlusion confirmed, and a panoramic radiograph obtained to confirm adequate seat.

Definitive prosthesis

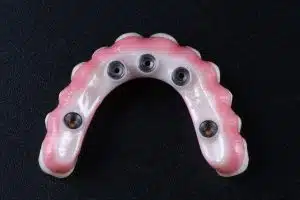
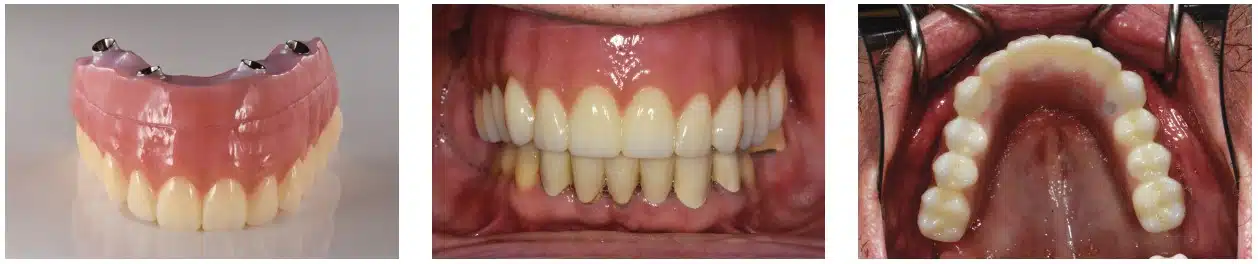
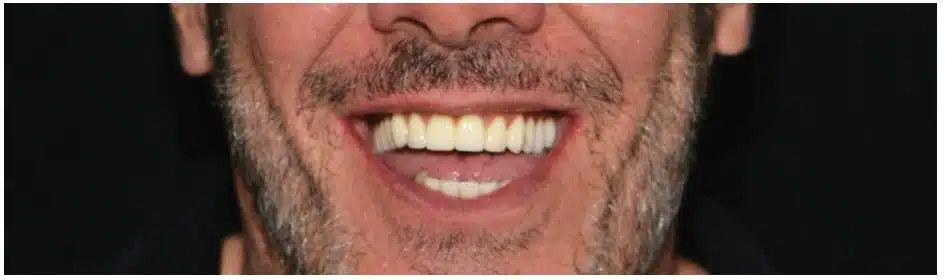
Following 2 months of healing, a CBCT was obtained. The patient was satisfied with the esthetics and occlusion achieved with the interim prosthesis. A definitive impression was made using a verification jig and VPS impression material. The master cast was poured and mounted on the semi-adjustable articulator. Teeth were set for a wax try-in; esthetics, occlusion, and maxillomandibular relationships were confirmed. Upon approval from the patient, the setup was processed using heat-cured acrylic resin. The acrylic resin pattern was tried once again to confirm passive fit, hygienic contours, esthetics, and occlusion. The height of the acrylic resin pattern presented a challenge as it was greater than the thickness of the zirconia puck. In order to address this limitation, a segmental approach was taken. The original pattern was scanned and then processed digitally to create two distinct segments. The base segment of the prosthesis would seat directly on the four multi-unit abutments through titanium copings luted to the zirconia structure. The coronal portion of this segment had two multi-unit abutments luted and a vertical extension 4 mm in height and 4 mm in width to provide mechanical retention to the second segment. The second segment had two titanium copings that would provide mechanical retention to the base segment in addition to the channel to allow cementation of both segments into one piece. Both segments were milled in using the XTCERA system and milled in Zirconia YZ (XTCERA, Zubler USA) and layered with DC Ceram™ 9.2 (Gingiva on Zirconia, Ceramay GmbH & Co.) feldspathic porcelain. The prosthesis was seated intraorally and prosthetic screws torqued according to manufacturer’s recommendations. Radiographs were obtained to verify a passive fit of the prosthesis. Home care instructions were given to the patient and the use of a water flosser explained. The patient was instructed to return for regular examinations every 4 months.

Conclusion

Edentulism is a chronically debilitating condition that affects patients physically and emotionally. This case demonstrates the management of a chronically edentulous patient using zygomatic dental implants and a novel approach for the fabrication of the definitive zirconia prosthesis.

Acknowledgment

The authors wish to acknowledge the assistance of Rob Dinker, CDT from Integrity Dental Services for his contributions to the design of the final prosthesis.

A practical guide to capturing the scans, verification records, photographs, and case details IDS needs for a complete digital workflow 

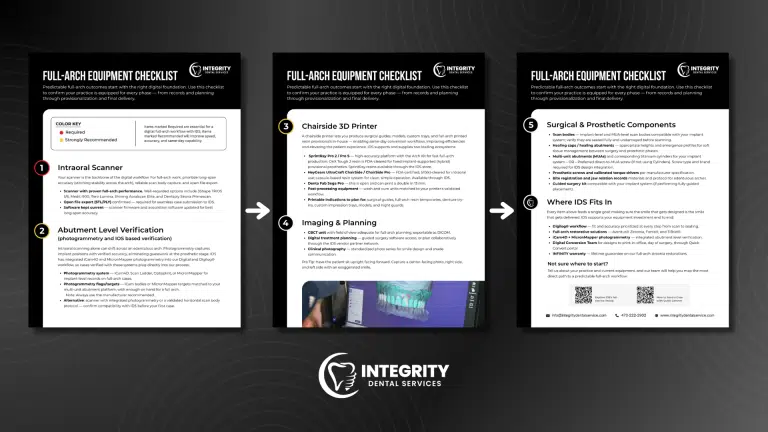
A full-arch dental equipment checklist is most useful when it functions as a clinical control point, not simply a shopping list. Used before, during, and after an All-on-X (AOX) appointment, it helps the team confirm that the equipment, components, and records required for the selected workflow are available and that the resulting data can be transferred to Integrity Dental Services (IDS) in a usable form. 

Clinical note: The checklist supports data capture and team standardization. Clinical decisions, component selection, torque values, resin use, and device operation should follow the treating clinician’s judgment and the applicable manufacturer instructions. 
Why the checklist belongs in the clinical workflow 

Full-arch cases combine anatomical records, prosthetic references, implant-position data, and workflow-specific components. A missing bite, an incomplete soft-tissue scan, an unidentified screw type, or a verification file that cannot be matched to the multi-unit abutment platform can interrupt the design process even when the surgery itself went as planned. 

The IDS checklist brings those dependencies into one preflight review. It connects five equipment categories—intraoral scanning, abutment-level verification, chairside printing, imaging and planning, and surgical/prosthetic components—to the records required in the IDS Digital AOX Workflow Guide. The benefit is not the checklist alone. The benefit is using it to create continuity from the planned restoration to the data acquired chairside and the files received by the laboratory. 

Start by defining the case pathway 

Before the appointment, identify the patient’s starting condition and the verification method the team will use. This determines which checklist items must be present and which records should be captured. The IDS workflow distinguishes among patients with stable articulation, patients using a removable partial denture to establish support or vertical dimension, and fully or singly edentulous patients. It also separates immediate postoperative workflows from healed data acquisition. 

Document the intended workflow type, fabrication method, prosthetic interface, and verification approach before treatment. For example, record whether the case will use segmentation, fiduciary markers, X-Nav, an MUA guide wash, or another method; whether the provisional will be printed or milled in-office or by the lab; whether the interface is direct-to-MUA or Ti-base; and whether verification will be photogrammetry-based or IOS-based. This short planning step turns the equipment checklist into a case-specific setup list. 

  1. Confirm the intraoral scanner is ready for full-arch capture

The intraoral scanner is the foundation of the digital record. For full-arch work, confirm long-span scanning performance, stable scan-body capture, current acquisition software, and open-file export. IDS requires an exportable STL or PLY file for a seamless digital submission. If your scanner, software, or export process is new to the team, test the transfer before the clinical appointment rather than discovering an access or format problem after records have been acquired. 

Clinically, use the scanner to capture the anatomy that will support alignment and articulation, not only the area receiving the restoration. Extend arch scans fully, review the capture for voids or stitching errors, and confirm that the bite aligns with both arches before dismissing the patient. In edentulous situations, recognize that a conventional intraoral arch scan may not provide enough stable geometry by itself; the workflow may require a denture scan, wash impression, fiduciary-marker reference, MUA wash, or another validated alignment method. 

  1. Select and verify the abutment-level record

An edentulous arch can accumulate stitching drift during intraoral scanning. The checklist therefore calls for an abutment-level verification method such as photogrammetry or a validated IOS-based protocol. IDS integrates iCam4D and MicronMapper photogrammetry into its digital and Digilog® workflows and also identifies IOS-based examples such as scan ladders, Optisplint, TruAbutment IO Connect, and Straumann Exact scan bodies. 

Before the appointment, confirm that the verification system is compatible with IDS and with the selected implant or multi-unit abutment platform. Inventory the manufacturer-recommended flags, targets, caps, or scan bodies in sufficient quantity for a full arch. At capture, verify that every component is fully seated, clean, undamaged, and correctly identified. Save the complete photogrammetry data folder or the complete scan-body folder rather than a single screenshot or isolated mesh. The laboratory needs the verification dataset and the component identity to interpret implant positions correctly. 

  1. Prepare chairside printing only when it is part of the plan

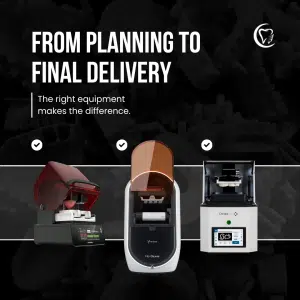
A chairside 3D printer can support surgical guides, models, custom trays, denture try-ins, and printed resin provisionals. Its clinical value depends on a validated production chain: the printer, indication-appropriate material, wash and cure equipment, current software, and a team that can complete post-processing according to the manufacturer’s instructions. 

Use the checklist to decide where fabrication will occur before the case begins. If the provisional will be produced in-office, confirm the validated material, available build capacity, post-processing equipment, and the handoff from the IDS design file to the printer. If IDS will print or mill the restoration, record that choice on the prescription so the laboratory can route the case correctly. A printer should expand a defined workflow, not create an assumption that every case must be converted chairside. 

  1. Capture imaging, planning, and photographic references

For guided planning, the checklist calls for a CBCT with an adequate field of view and exportable DICOM data, along with access to planning software or a collaborative planning pathway. Confirm that the imaging protocol matches the selected surgical workflow and that required scans can be associated with the correct patient and prescription. 

Photography carries the facial and prosthetic references that digital geometry alone may not communicate. The IDS AOX guide requires a full-face, centered smile photograph with the prosthesis in place and a centered retracted photograph, particularly when limited tooth structure is available for IOS alignment. The equipment checklist also recommends a standardized center, right, and left series with the patient upright, facing forward, and showing an exaggerated smile. Review images immediately for orientation, focus, exposure, and visible landmarks. 

  1. Stage the surgical and prosthetic components

The final equipment category prevents small component gaps from becoming large workflow interruptions. Confirm that implant-level and MUA-level scan bodies match the planned system. Stage the appropriate healing caps or healing abutments, MUAs, titanium cylinders or the preferred direct-to-MUA screws, prosthetic screws, and calibrated torque drivers. Record the component manufacturer, interface, screw type, and brand required for IDS design integration. 

Also prepare the materials and protocol needed to establish jaw relation on an edentulous arch. A complete implant-position record cannot compensate for an unstable or unverified occlusal relationship. The goal is to acquire implant position, tissue, arch form, occlusion, and facial reference as a coordinated dataset. 

Capture the correct preoperative records 

Once the equipment has been matched to the case pathway, use the IDS guide to capture the starting condition. Every submission should include a completed, precise prescription form. 


Stable articulation 

  1. Scan the maxillary and mandibular arches with visible teeth and relevant soft tissue, maintaining full extension and clear reference anatomy.
  2. Capture a stable bite that reflects the patient’s intended occlusal relationship and verify alignment to both arches.
  3. Acquire left and right check bites with the mandible maintained in the same position, scanning from the molars to the distal of the canines.
  4. Include the required centered smile and centered retracted photographs.


Removable partial denture 

  1. Scan both arches with the partial in place and again without it. The paired records help preserve vertical dimension and repeatable articulation when natural contacts are limited.
  2. Record the bite with the partial in place when it provides the more accurate and repeatable relationship, based on clinical judgment.
  3. Include the centered smile and retracted photographs with usable landmarks.

Fully or singly edentulous 

  1. For a completely edentulous patient, provide 360-degree scans of the upper and lower dentures. If a denture is ill-fitting, make a wash impression at the planned vertical dimension and in a repeatable bite position.
  2. For workflows using TADs or fiduciary markers, provide the indicated 360-degree denture scans and wash impressions at the planned vertical dimension of occlusion.
  3. For a single edentulous arch, provide a 360-degree scan of the denture, with or without a wash, and a bite registration that establishes the intended occlusal relationship. 
  4. Include the centered smile and centered retracted photographic records.
     

Complete the postoperative or healed record set 

Postoperative capture must match the selected alignment and verification method. For an X-Nav workflow, the IDS guide calls for photogrammetry data corresponding to the preoperative records and soft-tissue scans with the specified caps. For a fiduciary-marker technique, include the preoperative scan with markers, the anatomical reference used for alignment—teeth or soft tissue—and either the complete photogrammetry data folder or the complete IOS-based verification and scan-body folder. 

For an MUA guide wash technique, provide photogrammetry or the selected IOS-based verification. A single-arch submission includes a 360-degree scan of the MUA wash, the opposing arch, and an intraoral bite. A dual-arch submission includes 360-degree scans of the upper and lower MUA washes in occlusion. For segmentation, include the preoperative CBCT, postoperative CBCT with the applicable radiopaque scan body or cap, and verification-system details when available. 

For a healed workflow, provide upper and lower arch scans with full extension, a bite scan, and the complete verification dataset. Again, the verification files must arrive with enough information to identify the system and relate the data to the chosen components. 

Run a final clinical-to-lab handoff check 

Before uploading the case, have one team member who did not perform the capture review the package. A fresh review often catches missing files, unclear labels, or a discrepancy between the prescription and the acquired records. Confirm the following: 

12. Can IDS identify the patient, arch, workflow type, fabrication method, interface, component manufacturer, and screw type from the prescription? 

13. Do the arch scans, bite records, photographs, and verification data describe the same planned position and vertical relationship? 

14. Is the complete photogrammetry or IOS-verification folder included, with its corresponding soft-tissue or alignment record? 

15. Have all STL, PLY, DICOM, image, and supporting files been opened and checked before transfer? 

Consistent folder names can make the submission easier to review. Use plain, descriptive labels such as Pre-op Upper, Pre-op Lower, Bite Right, Bite Left, Photogrammetry, Soft Tissue, Denture 360, MUA Wash, CBCT, and Photos. Follow the IDS submission instructions and scanner-specific connection process for the actual transfer. 

What the practice gains from using the checklist 

Used consistently, the checklist creates practical benefits for both the clinical team and the laboratory: 

16.Fewer avoidable clarification loops. A completed prescription and coordinated record set reduce the need to reconstruct the intended workflow after the appointment. 

17.Better continuity from planning to design. The scan, bite, facial references, verification data, and component details remain tied to one case pathway. 

18.A repeatable team standard. Assistants, doctors, and laboratory partners can use the same checkpoints for setup, acquisition, quality control, and transfer. 

19.Earlier identification of workflow gaps. Compatibility, inventory, export access, and fabrication decisions are resolved before they become chairside problems. 

20.A more reviewable IDS submission. Clearly labeled, complete data helps the IDS team evaluate the case against the prescription and chosen verification method. 

Make the checklist part of the case, not an afterthought 

The most effective full-arch equipment checklist follows the patient through the workflow. Use it during scheduling to confirm capability, during setup to stage components, during the appointment to guide capture, and before submission to verify the handoff. That discipline helps protect the quality of the information on which the restoration will be designed. 

Before your first IDS case with a new scanner, photogrammetry system, IOS-based verification protocol, or chairside production pathway, contact the IDS team to confirm compatibility and submission requirements. Bring the checklist to that conversation so the clinical and laboratory teams can map the most direct workflow for your equipment and case type. 

Next step  |  Download the Full-Arch Equipment Checklist and review your planned AOX workflow with IDS at info@integritydentalservice.com or 470-222-2902. 
Related Posts